“The Terry” – Putting a handle on it!

Up until this stage, violin making always feels like you are working on two separate projects, the neck and the body. At this point, we take the two projects and make them one.

Installing the neck is my least favorite part of violin making. Working at the mortice for the neck root, you have to orient the end of the finger board in 3-D space. One cut with the chisel in the mortice can move the end of the fingerboard more than 1mm! It is a painstakingly slow process. Then, after you have carefully fitted everything and triple checked all of the various measurements (neck length, overstand at the neck root, projection to the bridge, orientation of the fingerboard to the axis of the instrument and perfect fit of all glued surfaces) you have to slather glue all over everything, shove it home, clamp it and hope to God (Allah, Budda, Vishnu, or whomever) that you got it right and nothing moved. There is no way to check until you take the clamp off. Then if something is wrong, it is too late.

Fortunately, all went well for The Terry!


I let it dry overnight, had a fitful sleep, and in the morning checked all of the dimensions. Perfect!

At this point we just shape the neck root and the button, finish shaping the neck and clean up the chin.


Tomorrow, we have a birthday!!!


“The Terry” – Putting it all together

We are on the home stretch! With all of the pieces done, we can start putting it all together.


The first step is to remove the rib assembly from the form. This is always a really scary step for me. I’ve never had a problem but the rib assembly seems so fragile and you really have to stretch it out to get it off of the form. But, if you take your time and go slowly it finally just pops off. It really is an amazing piece of engineering!


With the form removed, we clean up the the blocks and linings and glue on the back.


Next we put a makers label in it and glue the top on. We have a corpus!


With the corpus finished we turn to the neck. I have blogged before about carving the scroll. So I will pick up this time where I glue on the fingerboard and nut.


The next step is to remove the waste-wood and form the neck root (the part furthest away from the scroll that gets let into the body).


Finally, before we install the neck, we can form the chin and blend it into the scroll and the shape of the neck. The area around the neck root and the button must wait until after the neck is installed.


We are ready to install the neck!


“The Terry” – Reading the tea leaves

Now that both plates are at nominal dimensions, it is time to “tune” them. I get a lot of emails asking about my plate tuning methods. I’ll try to highlight the major points.

The goal is to slowly remove wood in the right areas in order to allow the plates to vibrate freely. At the same time, you don’t want to remove so much wood that the resulting instrument will lack power and projection. The question then becomes, where are the right areas and how do you tell when to stop? It is said that in Stradivari’s time the plates were tapped with a knuckle until they produced the right sound. I do this myself. As wood is removed the sound changes from a dull thud to a clear ring. It tells you when to stop but not where to remove wood. It is also said that they used some combination of back lighting and flex to reveal stiff parts of the plates. That may well be. I guess we will never know.

Since the time of Chladni and Helmhotz, a lot of research has been done on the resonant frequencies of violin plates. Most notably by Carleen Hutchins. Jonathon Rowe has a dedicated site that will tell you more than you would ever want to know about the history and the various theories on plate tuning. What I do is a variation of the theme.

There are many resonant modes of a violin plate. Carleen identified three (f5, f2 and f1) as the most important ones. She gave a target for f5 and indicated that f2 and f1 should be octaves of that. Personally I have never found f1 to be particularly useful. Also, I have never gotten f5 to be an octave above f2 (the ratio is more like 2.1 to 2.3). I suspect this has a lot to do with the arching I use for my plates. I find f5 to be the most useful and it guides most of my tuning activities.

So, what I do is weigh the plate. I then place it over a fixture I made that has a speaker connected to an amplifier and a signal generator. I sprinkle the plate with tea leaves and find the f5 and f2 resonant frequencies (play the videos below to see the resulting patterns formed). The shape of the patterns tells me where local areas of stiffness are on the plate. How lively the leaves bounce on the plate, the range of frequencies around the resonance and the weight of the plate tell me when to stop removing wood. For example, as I approach the optimum thickness I find that f2 will only vibrate the leaves within a couple Hertz of the resonant frequency and f5 generally within 3 to 5 Hertz.

It has been suggested that f5 on the top plate should be half a tone below f5 for the back. It has been my experience that a top that is at or just below the back produces good instruments. If it gets too much above, not so much.

Below are two videos of f5 and f2 that I took of the finished top plate for “The Terry”.


“The Terry” – Making the back

Now that I have an acceptable piece of wood it is time to get back (no pun intended)  to work. The workflow is the same as before:

  1. Flatten one side of the maple plank.
  2. Trace the outline using the rib assembly as a template.
  3. Rough in the arching and establish the purfling platform.
  4. Finalize the outline.
  5. Cut the purfling channel and install the purfling.

The purfling job came out quite nicely! The next step is to cut the sgusciatura and finalize the outside arching.


Very nice!!! Now we flip it over and gouge out the inside. While the top has a pretty much uniform thickness throughout, the back has varying thicknesses. Thickest in the central region and gradually getting thinner out to the lungs. This graduation pattern is very important for the overall tone of the completed instrument.  I use the general pattern taken from the original Provigny Strad on which the particular model is based. At this stage I leave it a little thick (about 5mm in the middle gradually going to 3.2 mm in the lungs).  I will vibrate the back to help me take it down to the final dimensions (I will talk more about this in the next post).


The back is done and tuned. We will now tune the top.


“The Terry” – The Saga Continues

The last time I blogged about “The Terry” I had just finished the third top. Unfortunately a similar story developed for the back.

I originally had a beautiful piece of quilted maple for the back. The good news for quilted maple is that it is very beautiful. The bad news is that what gives it that beauty is that it is cut off-the-quarter (meaning the grain lines don’t run perpendicular through the wood).  This is not usually a problem for violas and cellos but it can be a problem for violins depending on how stiff the wood is. As I was working this particular piece of maple, I just didn’t like the way it felt when I was cutting it. When I turned it over and started removing wood from the inside, I liked it even less. As a precaution, when I ordered the new top wood, I went ahead and ordered a new piece of maple as well.

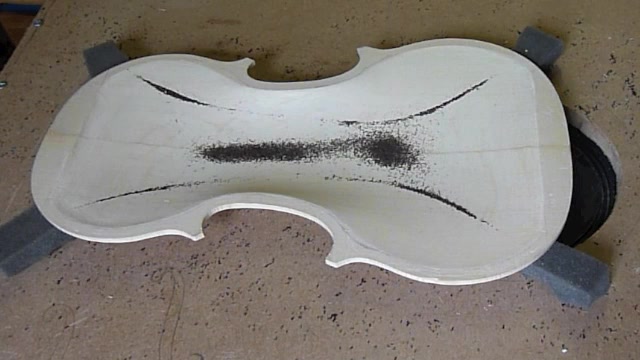
I finished the back before my new wood arrived and when I went to tune the plate, the resonant frequencies were quite low and I still had some wood to remove. It was clear that this back was not going to work for a concert soloist’s violin. I believe it will make a quite nice violin that will be easy to play and will produce a wonderful warm tone, but it won’t have the power and projection required for someone of Terry’s skill.

So, when I finished the top for “The Terry”, I started the second back. It is a beautiful piece of maple but as I was working the outside, a small knot appeared. It was very small and wouldn’t affect the integrity or the sound of the instrument, however, on a one-piece back, some view it as character and others view it as a blemish.


Unfortunately my time was up on Lummi Island and I had to head back to London. I stopped in Houston on the way and showed the back to Terry. She viewed the knot as a blemish. Because I guarantee 100% satisfaction, I agreed to make a new back.

That turned out to be a lot easier said than done. I asked my supplier in the U.S. to send me some pictures of their best quality one-piece backs. They had nothing I liked. When I got back to the U.K., I went to the two suppliers I use there, nothing (although I did find a nice cello back that I bought). I checked suppliers in France, Italy, Croatia, Slovenia, and Romania and still nothing. The biggest problem with the wood I saw was that it was grown in too warm of a climate. The summer grain was quite wide and I was afraid the the stiffness of the plate would suffer.

After checking with two more suppliers in Germany, I finally found a piece I liked. Andreas Pahler had a very nice one-piece back (I ended up buying a bunch of neck blocks from him as well). It finally arrived so I am back to work on “The Terry”!!!


“The Terry” – making the top(third time is a charm)

As all of my wood is back in London, I had to order a new set of top wood from Howard Core. They are a very good supplier for all things violin here in the States. They are a good source for players as well as makers. They have a very good supply of Tyrolean spruce all of it aged more than 10 years. I just called them and told them what I wanted. The person who pulled the stock took a picture and emailed it to me to make sure it met my specifications. I wrote back and accepted the item pulled and I had it within 3 days. Great service!

Like before, I traced the outline of the ribs and cut it out. I removed some waste wood (no sign of voids!). Then I established the purfling platform.

The next step is to cut the purfling channel, bend the purfling and mitre the corners. I like to keep my edges about 0.5mm too thick at this stage and then cut the channel about 2.5 mm deep. The purfling is a little less than 2 mm so this leaves room for clean-up and allows for cutting the sgusciatura without removing too much of the purfling.

With the purfling installed, I cut the sgusciatura, and finish the arching shape for the top.

I have to go back to London in a couple of days so I will wait to finish the top when I get back there. I still have time to get the back to this stage however so on we go.

“The Terry” – making the top (second try) lightning strikes twice!

With the disappointment of the first try behind me, I proceeded to try again with the wood Towner provided me. As before, I joined the two pieces, cut the outline and started removing the waste wood. That is when another void appeared!!!

Just when I was at my most frustrated, my friend Joey stopped by the shop for a visit.

He always has a way of putting everything into perspective. On we go.

“The Terry” – making the top (first try)

The next step in the process is to make the top plate for the violin. After the two halves of the top are joined, we use the rib assembly to establish the outline of the violin.

I trace around the rib assembly with a washer that offsets the outline by about 3 mm. I then cut out the top just out side of this line. The next steps are to remove a lot of the excess wood by roughing-in the arching. This is followed by forming the outline by just removing the pencil mark and then forming a purfling platform in which to install the purfling. That was the plan. Sometimes things don’t always go according to plan.

As I was removing waste wood a large sap-filled void revealed itself. It was too deep to be removed. There is nothing left to do but start over. As I have left my wood supply back in London, I was in a real bind. Fortunately, there is another violin maker on the island (Towner McLane) who kindly came to my aid by supplying me with another piece of top wood. Violin makers are really nice people!

I proceeded to join the new top. While that dries, I will go ahead and work on the back.

“The Terry”

Terry Chang

I am starting a new violin, “The Terry”. This is commission from Terry Chang. Terry is a lovely young violinist for whom I made a bow for some years ago. She recently re-connected with me through my web page and commissioned a Strad model violin. My new studio is complete on Lummi Island so I decided to build this instrument there. Hopefully the beautiful views will inspire me to make an exceptional instrument.

Terry chose a one-piece back of beautiful quilted maple. It should be quite nice when it is done. We also have a nice piece of Italian spruce as well as ribs and a neck of nicely flamed maple that should compliment the back nicely.

We will start with the rib assembly. Willow blocks are cut and glued to the mold. The blocks are then shaped to the outline of the violin. We start with the C-blocks first.

The ribs are planed and scraped to a thickness of about 1.1 mm, bent and glued to the blocks.

We do the same with the other ribs and blocks and inlet the C-blocks to receive the linings.

Linings are the cut and bent and glued to the ribs.

We now have a finished rib assembly. We will use this rib assembly to establish the outline for the top plate in the next step.

“The Edward” – is born

After gluing in the neck, we can finish off shaping the neck, heel and button. We then do the set-up, which involves making and installing the saddle, reaming the holes for the pegs and the button, cutting a sound post and bridge and finally stringing it up.

I never ceased to be amazed at how the tone of a new violin changes over the first few days as the stresses relieve and the instrument “gets used” to being a violin. When I first play it, it never sounds very good. You can tell whether it is going to be good or not but it is very hard to resist fooling around with the set-up to see if you can make it better. After 45 minutes, the tone improves 100%. Everything starts opening up a little bit. After several hours it is like a different instrument. This goes on for several days until the tone finally starts to stabilize.

It has been about a week now and I have to say “The Edward” is amazing! Maybe the best ever. The tone is full and powerful and very even across all of the strings. I can’t stop playing it. I’ll leave it in-the-white for a couple more weeks while I work on a bow commission but then I will take it down and varnish it. Below are some pictures of the completed instrument.

close-up scroll

I am very pleased and I’m sure Ed will be as well.